Ok, so I already shared about how and why we are making this change. Now it's time for details and pics!
I'll start with my desk and make my way around the room. As soon as you walk through the door you see my desk set up and my wall shelf. The wall shelf that David built me a few years ago for when I was scrap booking. I wanted it to hold my ribbon collection and the clips were to hold finished scrapbook pages. I designed it and David built it. I no longer use the clips for pages, so I just hang pretty paper from the clips as extra art. I do still love the shelf and kept it the same. I did add my button jar and a hurricane vase filled with twine, wire and an old thread spool.

My desk was shoved down to the corner, and I had to rearrange some things on my desk to fit everything I needed: my wood drawer unit, my sewing machine, my lazy susan, my laptop and my new serger. I put my OTT-Lite on top of my wood drawer unit so it's up high to give me light in that corner and free up valuable desk top space. I painted that white frame, it used to be black. Above my desk I had made a magnetic board a few years ago. Ok, my dad made it. I just bought some stock molding, a piece of plywood and a piece of sheet metal. It had been painted black but I was doing away with black. I found a sample size of paint in my stash and just used that. It had to be rehung since moving the desk and the red Simple sign above it was moved too. David found it at a craft fair a couple years ago and gave it to me for Christmas.


Next to my desk on the left and beside the door, is my white cabinet. It now holds my printer and a new lamp from Lowe's. I walked by this lamp and fell in love. When I needed a new lamp for this spot I knew exactly which lamp I wanted! I was using an extra lamp that was too big for this spot. After doing some lamp rearranging in the living room I was able to get rid of a base and shade that I didn't love and free up space in here for one I did.
The cabinet holds sewing patterns in the drawer. Some computer components and 2 white boxes in the cubby and in the base I have our office supplies. I still need to get some drawer pulls that fit in better but these work for now.
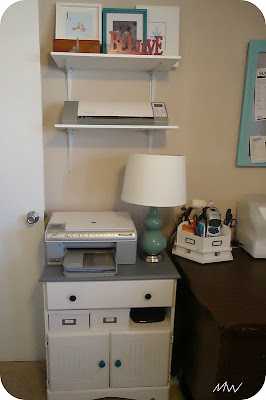
My favorite part is the shelves above the cabinet. I needed a good place to put my new Silhouette Cameo, so I had David cut some left over plywood from our headboard and I painted them white. If you look close you can see the rough surface, but I already had the wood and didn't want to buy more. We just bought the brackets which cost about $8 for both shelves. I don't keep the Cameo plugged in, so when I need to use it I take it down and put it on my desk and plug it in. I couldn't keep it on the desk so this is the next best thing. It works great for me.
The second shelf is just for cute/pretty/fun stuff. I just used a bunch of stuff I already had and made it work. And I really like how it looks. The box is one I've had since high school a free gift for graduating from a local furniture store. The Believe sign was unfinished originally from Hobby Lobby at Christmas time a few years ago. I'd painted it for Christmas but it wasn't working anymore, so I sprayed it pink with some paint I already had. The crystal light house came from my grandmother after she passed away. I love glass/sparkly stuff, so I got it!
The frame on the left I picked up at Goodwill and took out the glass which had some decorative stuff on it. I found this free printable on Pinterest which was so cute and I used some more in Trey's room which I'll show another time. The frame next to it was one I had in T's room and liked it as is, along with the pic of him and his best girl holding hands 2 summers ago. The other white frame was one that I had on T's wall gallery. It was a Goodwill find and I'd painted it black. I just repainted it white and used my new Cameo to cut a star out of teal card stock matted on some white paper.

Behind my desk chair that is actually an extra dinning room chair, is the recliner from T's room. With all the furniture moving around we we're going to have room for it in T's room and I knew if we wanted to make this room somewhere all of us could hang out in we needed a comfy chair. And yes, it's big and the room is small, but we used what we had and it's working. I'm going to recover the pillow and I'm making some new curtains too. These curtains were originally for the living room and when I found better ones in there, these came to live in here. We have weird 70's arched windows in here and the blinds don't cover that part. So if we were in here at night with the lights on, the neighborhood knew about it. I'll post about the curtains and pillow cover when I get them done.

Now for the workhorse of the room. The shelves. We installed the top shelf last spring to hold David's books. Since rearranging stuff it has taken on many more books. Those are all of David's that he wants accessible (the rest are in boxes in storage, the man loves books!). Since that was working so well I thought it would be great to add more shelves. So, we bought some boards cut to fit the wall, I painted them white and David installed them with some brackets I sprayed silver (they were a dull grey).

I couldn't wait to get these babies installed in the room. I knew I wanted them to hold baskets and games. I bought the fabric baskets at Target in fun colors. I made labels using my Cameo and writing the contents in coordinating ink to the basket. I like that they look cohesive. On the middle shelf: beads & jewelry stuff, craft kits, white boxes hold paint chips and paperback novels of mine, craft supplies, Christmas stuff and my Epic 6. Bottom shelf: craft paints, blank canvases, all my paper/stickers, lettering & stencils, Trey's new games, our Apple TV (totally awesome BTW), Wii, and video games/components.

A lot of the stuff in the baskets is left over from my scrap booking days but are good for other crafty projects, so I kept them. I can purge a lot of stuff, but getting rid of craft stuff is harder for me. I absolutely LOVE these shelves! I like that they will be flexible for whatever stage we're in or decide to do in this room. I can easily make a new label and switch out the contents of the baskets.
Bellow the shelves are T's toy box, his toy vacuum, his cooking stuff and his blocks.

On the last wall is the t.v., with T's table and chairs below. Then I rehung David's comic books and the dry erase board over the white cubes. The drawers on the left hold all T's colored pencils, deco scissors, stickers, colors, coloring books and paper. I made some picture labels in MS Word from their clip art, to help him and other kiddos know where things are and where they need to go back. And he has a drawer on the right that holds his balloons that daddy blows up for him. Ignore the cords from the t.v., I'll be covering them soon.


The books are all mine to the right of his drawers, and I have a drawer for my vinyl, the other drawer is empty. On top of the cubes is a photo box that holds some beginner books for T and a drawer unit with vowels and words. Trey LOVES letters!
The baskets hold all of T's puzzles. He had some puzzles before Christmas but ended up with many more after. The boxes that they came in took up too much room and they were getting torn and falling apart. So, I ditched all the boxes and each puzzle went into a zippy bag. I made a copy of the pic of the puzzle and put that in the baggy. This is working beautifully! They take up a fraction of the space they used to, nothing is torn, the bags are easy for T to open and close by himself and they all fit into these baskets. He even had a couple of puzzles that came with a wooden board that wasn't necessary, so the board went as well. I separated them by picture puzzles on the bottom and letter, number, shape puzzles, matching games on top.


Our goal for the room was to make it a place that all of us could enjoy at the same time. I could play at my desk, Trey could play with his toys, puzzles, games or coloring stuff and David would watch a movie or play with his iPad. We have accomplished this and we are in love with this room! It's a fun, creative place to be.
Here's a last look around the room.


Thanks for reading this long post! Comments make me Happy!
I'll start with my desk and make my way around the room. As soon as you walk through the door you see my desk set up and my wall shelf. The wall shelf that David built me a few years ago for when I was scrap booking. I wanted it to hold my ribbon collection and the clips were to hold finished scrapbook pages. I designed it and David built it. I no longer use the clips for pages, so I just hang pretty paper from the clips as extra art. I do still love the shelf and kept it the same. I did add my button jar and a hurricane vase filled with twine, wire and an old thread spool.

My desk was shoved down to the corner, and I had to rearrange some things on my desk to fit everything I needed: my wood drawer unit, my sewing machine, my lazy susan, my laptop and my new serger. I put my OTT-Lite on top of my wood drawer unit so it's up high to give me light in that corner and free up valuable desk top space. I painted that white frame, it used to be black. Above my desk I had made a magnetic board a few years ago. Ok, my dad made it. I just bought some stock molding, a piece of plywood and a piece of sheet metal. It had been painted black but I was doing away with black. I found a sample size of paint in my stash and just used that. It had to be rehung since moving the desk and the red Simple sign above it was moved too. David found it at a craft fair a couple years ago and gave it to me for Christmas.


Next to my desk on the left and beside the door, is my white cabinet. It now holds my printer and a new lamp from Lowe's. I walked by this lamp and fell in love. When I needed a new lamp for this spot I knew exactly which lamp I wanted! I was using an extra lamp that was too big for this spot. After doing some lamp rearranging in the living room I was able to get rid of a base and shade that I didn't love and free up space in here for one I did.
The cabinet holds sewing patterns in the drawer. Some computer components and 2 white boxes in the cubby and in the base I have our office supplies. I still need to get some drawer pulls that fit in better but these work for now.

My favorite part is the shelves above the cabinet. I needed a good place to put my new Silhouette Cameo, so I had David cut some left over plywood from our headboard and I painted them white. If you look close you can see the rough surface, but I already had the wood and didn't want to buy more. We just bought the brackets which cost about $8 for both shelves. I don't keep the Cameo plugged in, so when I need to use it I take it down and put it on my desk and plug it in. I couldn't keep it on the desk so this is the next best thing. It works great for me.
The second shelf is just for cute/pretty/fun stuff. I just used a bunch of stuff I already had and made it work. And I really like how it looks. The box is one I've had since high school a free gift for graduating from a local furniture store. The Believe sign was unfinished originally from Hobby Lobby at Christmas time a few years ago. I'd painted it for Christmas but it wasn't working anymore, so I sprayed it pink with some paint I already had. The crystal light house came from my grandmother after she passed away. I love glass/sparkly stuff, so I got it!
The frame on the left I picked up at Goodwill and took out the glass which had some decorative stuff on it. I found this free printable on Pinterest which was so cute and I used some more in Trey's room which I'll show another time. The frame next to it was one I had in T's room and liked it as is, along with the pic of him and his best girl holding hands 2 summers ago. The other white frame was one that I had on T's wall gallery. It was a Goodwill find and I'd painted it black. I just repainted it white and used my new Cameo to cut a star out of teal card stock matted on some white paper.

Behind my desk chair that is actually an extra dinning room chair, is the recliner from T's room. With all the furniture moving around we we're going to have room for it in T's room and I knew if we wanted to make this room somewhere all of us could hang out in we needed a comfy chair. And yes, it's big and the room is small, but we used what we had and it's working. I'm going to recover the pillow and I'm making some new curtains too. These curtains were originally for the living room and when I found better ones in there, these came to live in here. We have weird 70's arched windows in here and the blinds don't cover that part. So if we were in here at night with the lights on, the neighborhood knew about it. I'll post about the curtains and pillow cover when I get them done.

Now for the workhorse of the room. The shelves. We installed the top shelf last spring to hold David's books. Since rearranging stuff it has taken on many more books. Those are all of David's that he wants accessible (the rest are in boxes in storage, the man loves books!). Since that was working so well I thought it would be great to add more shelves. So, we bought some boards cut to fit the wall, I painted them white and David installed them with some brackets I sprayed silver (they were a dull grey).

I couldn't wait to get these babies installed in the room. I knew I wanted them to hold baskets and games. I bought the fabric baskets at Target in fun colors. I made labels using my Cameo and writing the contents in coordinating ink to the basket. I like that they look cohesive. On the middle shelf: beads & jewelry stuff, craft kits, white boxes hold paint chips and paperback novels of mine, craft supplies, Christmas stuff and my Epic 6. Bottom shelf: craft paints, blank canvases, all my paper/stickers, lettering & stencils, Trey's new games, our Apple TV (totally awesome BTW), Wii, and video games/components.

A lot of the stuff in the baskets is left over from my scrap booking days but are good for other crafty projects, so I kept them. I can purge a lot of stuff, but getting rid of craft stuff is harder for me. I absolutely LOVE these shelves! I like that they will be flexible for whatever stage we're in or decide to do in this room. I can easily make a new label and switch out the contents of the baskets.
Bellow the shelves are T's toy box, his toy vacuum, his cooking stuff and his blocks.

On the last wall is the t.v., with T's table and chairs below. Then I rehung David's comic books and the dry erase board over the white cubes. The drawers on the left hold all T's colored pencils, deco scissors, stickers, colors, coloring books and paper. I made some picture labels in MS Word from their clip art, to help him and other kiddos know where things are and where they need to go back. And he has a drawer on the right that holds his balloons that daddy blows up for him. Ignore the cords from the t.v., I'll be covering them soon.


The books are all mine to the right of his drawers, and I have a drawer for my vinyl, the other drawer is empty. On top of the cubes is a photo box that holds some beginner books for T and a drawer unit with vowels and words. Trey LOVES letters!
The baskets hold all of T's puzzles. He had some puzzles before Christmas but ended up with many more after. The boxes that they came in took up too much room and they were getting torn and falling apart. So, I ditched all the boxes and each puzzle went into a zippy bag. I made a copy of the pic of the puzzle and put that in the baggy. This is working beautifully! They take up a fraction of the space they used to, nothing is torn, the bags are easy for T to open and close by himself and they all fit into these baskets. He even had a couple of puzzles that came with a wooden board that wasn't necessary, so the board went as well. I separated them by picture puzzles on the bottom and letter, number, shape puzzles, matching games on top.
 |
| This is what we started with. |


Our goal for the room was to make it a place that all of us could enjoy at the same time. I could play at my desk, Trey could play with his toys, puzzles, games or coloring stuff and David would watch a movie or play with his iPad. We have accomplished this and we are in love with this room! It's a fun, creative place to be.
Here's a last look around the room.


Thanks for reading this long post! Comments make me Happy!
No comments:
Post a Comment[Reply to comment]
Please leave a comment, I'd love to hear from you!
I will respond to questions in the comments, Thanks!