I made this shirt about 2 weeks ago so I'm a little slow in showing it off! Well, I've been seeing tutorials in my sewing blogs about making what's called a pillowcase dress for little girls. They are called pillowcase dresses because you use an old pillowcase to make the dress. You just cut the arm and head holes. I wanted the same look but in a shirt for myself. Unfortunately I couldn't find a tutorial for a shirt or for women instead of girls.
After a very unsuccessful attempt in which I ruined a cut of fabric, I was a bit skittish about trying again. David suggested using one of his old t-shirts to make a template. He's so helpful! It was a great idea!
So I put his shirt on (he wears XL and I wear M to give you an idea) and took my red sewing pencil and started drawing the shirt out (yes while wearing it). Then I took it off, cut out what I'd drawn and pinned it and tried it on again. Then it was a lot of checking the mirror, making adjustments, taking it off, making adjustments and trying it back on. This took me at least an hour.
After I finally felt like I had a good rough draft, I took it off and used it to make a paper template (by tracing it and giving a seam allowance). After I had the paper template, then I was ready to cut my fabric.
Now I'm going to tell you how you SHOULD do it not how I did it. The way I did it would work but it took way longer and I had to take out lots of stitches.
 You'll need:
1 yd of fabric (unless you use 2, then you'll probably need 1/4 yd more)
ribbon
thread
After cutting the fabric sew the border hem piece to the main body of the shirt (I used 2 fabrics to make this shirt, but you don't have to). Then sew a hem on the arm holes, making sure not to sew the front and back pieces together (which I did!). So you'll sew a hem on 4 areas: front left arm, front right arm, back left arm and back right arm. I just folded a 1/4" down and ironed it so it would stay then sewed it down.
After the arms, sew a hem on the neckline for both the front piece and the back. You'll sew a casing for the ribbon later, so this is just a small hem. Same as with the arm holes.
Now pin the front and back together right sides facing and sew a 1/4" seam. Turn it right side out and try it on. This is where you will see where you want the top to hit and the hem to hit. I pin them where I want to sew them and take the shirt off.
Sew the hem up, starting with a little 1/4" hem first then a bigger 1" one (this gives a more finished edge). Then sew the casing for the ribbon. You'll want it just a smidgen bigger than the width of the ribbon. Sew that down then take your ribbon and put a safety pin on one end and feed it through the casing till you get it on the other side.
At this point I tried it back on and tied the ribbons together (front to back). I wanted a gather in the front so I gathered it the way I wanted and pinned each side (in the front, didn't want it gathered in the back). Then back off, and ran a little stitch on each side of the shirt where the ribbon comes out of the casing to lock the ribbon in place (so it won't fall out in washing, and to keep the gathered look). Iron it and you are done.
I think that once you have a pattern it will take about an hour to make. It's pretty simple but making the pattern took forever or it felt like it!
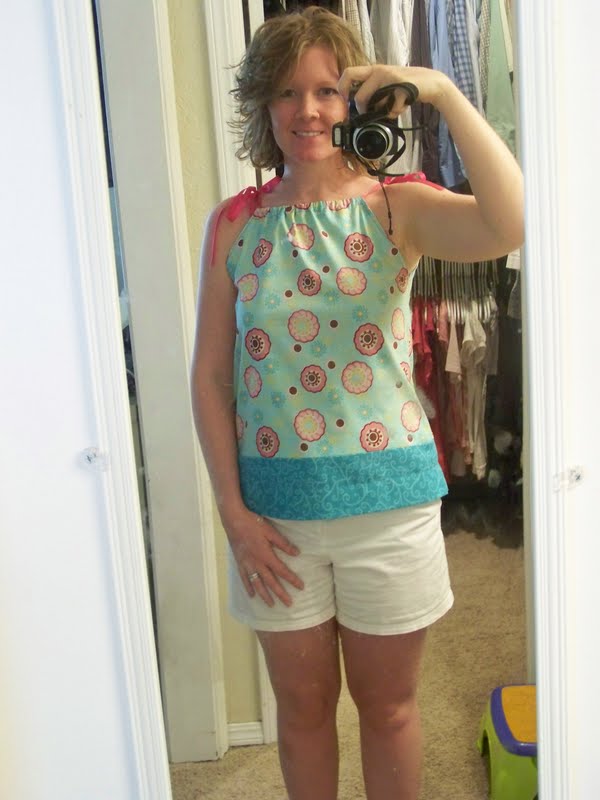
Here it is.

 I'm pretty happy with it and I love the fabric! I'm usually a solid color shirt kind of girl but I'm trying to branch out and get some pattern in my life! I should say I just noticed that I took these pics before I gathered the top.
So have you made a shirt before or anything wearable?
Comments make me Happy!
After a very unsuccessful attempt in which I ruined a cut of fabric, I was a bit skittish about trying again. David suggested using one of his old t-shirts to make a template. He's so helpful! It was a great idea!
So I put his shirt on (he wears XL and I wear M to give you an idea) and took my red sewing pencil and started drawing the shirt out (yes while wearing it). Then I took it off, cut out what I'd drawn and pinned it and tried it on again. Then it was a lot of checking the mirror, making adjustments, taking it off, making adjustments and trying it back on. This took me at least an hour.
After I finally felt like I had a good rough draft, I took it off and used it to make a paper template (by tracing it and giving a seam allowance). After I had the paper template, then I was ready to cut my fabric.
Now I'm going to tell you how you SHOULD do it not how I did it. The way I did it would work but it took way longer and I had to take out lots of stitches.

1 yd of fabric (unless you use 2, then you'll probably need 1/4 yd more)
ribbon
thread
After cutting the fabric sew the border hem piece to the main body of the shirt (I used 2 fabrics to make this shirt, but you don't have to). Then sew a hem on the arm holes, making sure not to sew the front and back pieces together (which I did!). So you'll sew a hem on 4 areas: front left arm, front right arm, back left arm and back right arm. I just folded a 1/4" down and ironed it so it would stay then sewed it down.
After the arms, sew a hem on the neckline for both the front piece and the back. You'll sew a casing for the ribbon later, so this is just a small hem. Same as with the arm holes.
Now pin the front and back together right sides facing and sew a 1/4" seam. Turn it right side out and try it on. This is where you will see where you want the top to hit and the hem to hit. I pin them where I want to sew them and take the shirt off.
Sew the hem up, starting with a little 1/4" hem first then a bigger 1" one (this gives a more finished edge). Then sew the casing for the ribbon. You'll want it just a smidgen bigger than the width of the ribbon. Sew that down then take your ribbon and put a safety pin on one end and feed it through the casing till you get it on the other side.
At this point I tried it back on and tied the ribbons together (front to back). I wanted a gather in the front so I gathered it the way I wanted and pinned each side (in the front, didn't want it gathered in the back). Then back off, and ran a little stitch on each side of the shirt where the ribbon comes out of the casing to lock the ribbon in place (so it won't fall out in washing, and to keep the gathered look). Iron it and you are done.
I think that once you have a pattern it will take about an hour to make. It's pretty simple but making the pattern took forever or it felt like it!
Here it is.

So have you made a shirt before or anything wearable?
Comments make me Happy!
No comments:
Post a Comment[Reply to comment]
Please leave a comment, I'd love to hear from you!
I will respond to questions in the comments, Thanks!