Sunday, July 3, 2011

Dinning Room Before

I'm in the process of reworking my dinning room and kitchen. Well, all that's really changed in the kitchen is new towels and a new rug. The kitchen has gone as far as I can take it without doing major work. But the dinning room needed a change. The red curtains and rug were making the small room feel dark and heavy and lately I want everything to be light and airy and bright. And the red and brown was looking old and too formal for what I really want.

The table and chairs I received from my grandmother 2 years ago. I needed a new table set and I liked hers, so when it was time I got it. It needed some refinishing and the fabric on the chairs needed something new but I was happy with it as is so I left it till I was ready. The chairs have a piece of plastic over the fabric to keep the fabric in good shape. Hey, my grandma came from a different time! At first I wanted to rip it right off the chairs but she stapled those suckers on really well! So they stayed.

You can see the plastic reflecting back.

Then I started to like them! When you have a toddler or any small children eating at a table with fabric covered chairs you like having a sheet of plastic covering things you can't wipe down! So my plan was to change the fabric and keep the plastic.

After searching for fabric I finally found one in a green and whitish pattern that I really liked and it was outdoor fabric. When I realized that the fabric was outdoor I realized that I wouldn't have to reuse the plastic! The outdoor fabric is super durable and easy to wipe off (the pattern helps to hide things too). And I ended up ordering too much fabric so I have extra in case something happens that can't be fixed and looks too hideous! Ok just a bit too dramatic!

Here's the fabric I ordered from Joann's for the chairs.


Now curtains. I'd been looking for a while all over the not expensive world for new curtains and just wasn't finding anything I was looking for. I wanted a pattern but nothing too crazy or bold. Pattern is big enough for me so it had to be something I really liked/loved and not something too trendy because I didn't want to hate it in 6 months. I also wanted them to be blues/greens/white/tan kind of colors. Cool summery colors. But like I said I couldn't find anything fitting that bill. So I started looking at fabric thinking I could just make some.

Here's a pic of the red curtains. Sorry, it's kind of a dark pic.

I found some at Joann's online and kept looking at it to make sure I really wanted it to come home. The only problem with this fabric is that width wise there wasn't enough to make one panel. So I knew I'd have to find something else to put with it. But I waited until it came in to take it to Hancocks to find a coordinating fabric to put with it.

Here's the curtain fabrics.


The stripes go up and down not left to right.

Now I just finished making the curtains and I'll share about those later and I'm in the process of recovering the chairs (not a quick process) which I'll share later as well. But I have plans to paint the table and chairs. This for me is a big decision because I have a sort of personal rule about painting wood. Usually if it's solid wood and in good condition I will strip and re stain the wood. Particle wood or cheap ugly wood I paint. But in this case the only sane way to strip the stain off of the chairs is by dipping them and that is more money than I want to put into this right now. However that may be something I do in the distant future.

I also don't want them to match and the wood just isn't working for me right now. I am taking this as I go and nothing is set in stone. I'm going to see how the chairs look with the new fabric and take it from there. So, I'll let you know how that all works out. I'm hoping to have this project finished by August but we'll see!

Wow, I've got a LOT to do!

Comments make me Happy!

Friday, July 1, 2011

Chalkboard Project


So if you remember how a few weeks ago I found a frame at Goodwill and got it all painted up so I could turn it into a chalkboard for my kitchen-dinning room.


                                   Ok, here's the before of the ugly but totally redeemable frame.

                                                 And here it is after my spray paint work.

After begging asking my dad for some scrap wood to use as the back/chalkboard part he was kind enough to cut it to size for me.


I priced chalkboard paint at Lowes and found they only had one option that was a quart for $13. I decided to see what Home Depot had. I'm SO glad I did that! They had the quart that Lowes had for $10, and they had it in a spray can for $4.67 and had quarts in different colors to choose from! A much better selection AND price! After talking to the HD paint lady she suggested that since I was using bare wood to get a grey primer and at about $2. And I decided to try the spray chalkboard paint.

I sprayed 2 coats of primer to make sure it was covered well. Then I sprayed 3 coats of the chalkboard paint. I wanted to make sure it was covered really well and that it was definitely a chalkboard. The directions on the can say after the final coat to take a piece of chalk and rub it all over the board then wipe it off and BAM! you have a usable chalkboard.

I was very pleased with the paint and it was super easy!
I LOVE the way this turned out! I have it in the Kitchen-Dinning room to write our menu for the week as well as things I need at the grocery store. It's convenient and it looks great and fills a formerly blank area.
I love it!!!

Comments make me Happy!

Monday, June 27, 2011

Jam Time!

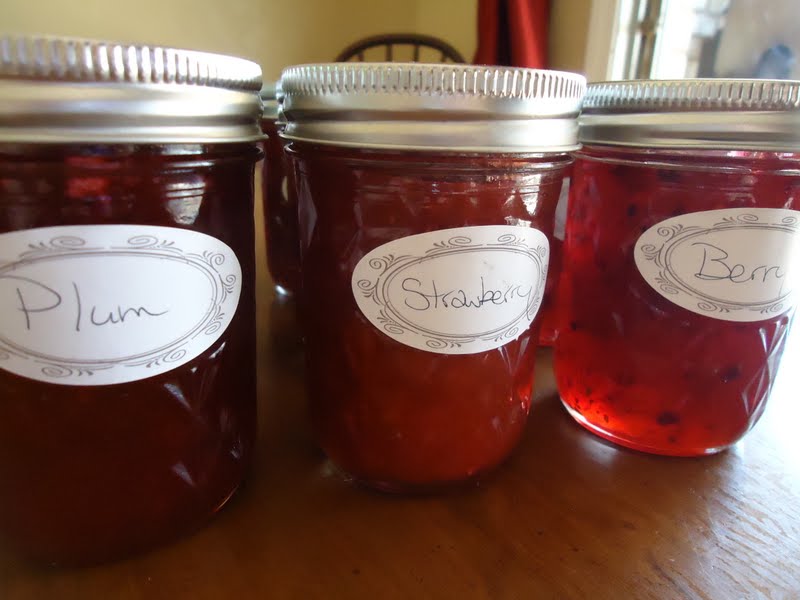
So this weekend my mom and I made 3 batches of jam. This is something I've been wanting to do this year. I was hoping to go pick some strawberries at a good price and be able to make lots of jam and also freeze some. Unfortunately here in OK the strawberries aren't doing so well this season.

But my mom saw that Aldi had strawberries 1lb for $1, which was the best price we'd seen, so we decided to make some jam. We also picked up some plums, because David loves plum jelly.

I'd found a recipe for a Strawberry-Honey Jam recipe a couple of months ago so we were going to try a batch of that, a batch of plum and a batch of strawberry-blackberry-raspberry. We just used the recipes that came on the insert with the pectin.

This would be the part where I was a good blogger and took lots of pics of the process but I wasn't and I didn't. It took us a few hours to  do and my mind was not on taking pics, SORRY!! This was my first time making jam but my mom has done it tons of times, so I just helped or did what she told me to do.

We started by putting our canning jars in the dishwasher to make sure they were sterilized and then put the new lid tops (not the screw on part) in a pot of boiling water.

Then LOTS of washing, cutting and crushing the strawberries. We used 2 packages of strawberries mashed (with the potato masher) minus 3 cups and then added about that much of blackberries and raspberries (my mom just had some frozen that we threw in at the last minute).

Then lots of stirring adding in the pectin and sugar and more stirring and boiling and wa-la we had jam! We filled jars and put on lids. Then on to the next batch.

We made the Strawberry-Honey recipe next. It called for lemon juice and honey instead of sugar. It was basically the same process but boiled longer. However it didn't make as much jam because it didn't have all that sugar taking up room. I think it made about half what the berry recipe did. But I'm excited about it because I won't feel so bad about eating it!

The plum jam was last. We had to cook the plums first then put in the pectin and sugar and somehow we ended up with more plum than the berry.

We were really tired after making all that jam but I'm really happy that we did it! I came home with 12 8oz jars of jam and that was my half of what we made. I don't really think it came out to save me much money, after buying the jars, fruit, sugar, pectin and honey but the amount was spread out over time. I bought the jars months ago and the honey weeks ago. The fruit wasn't a bad price but it would have been better to get it even cheaper. Next year it will be cheaper because I will already have the jars.

My other reason for making homemade was because buying jam at the store without high fructose corn syrup is expensive. I wanted to have some jam with regular sugar or organic sugar or honey. So while the berry and plum jams have regular sugar in them they don't have HFCS which is bad for us but it hurts me too. I want to enjoy eating my jam and nothing beats homemade!

I have plans to can other things as well but I'll share how that goes when we get there.

Have you canned anything or made homemade jam/jelly? Do you have any recipes to share?

Comments make me Happy!

Friday, June 24, 2011

Good Intentions

Well, I had good intentions on researching and writing yesterday. But what happened was that our computer decided to go to sleep and not wake up....
Obviously there was no researching or writing. It has now been fixed and today my plans include sewing! I've already made myself a new skirt (I'll show it off later) and plan to make another one and some other projects.

SO, I will be catching up on my writing interesting posts this weekend as well as yard work, hopefully some painting, and just hanging out with the family!
I hope everyone has a great weekend!

Wednesday, June 22, 2011

My New Desk

So I told you about my Goodwill trip where I found the framed painting. Well, on that trip I also went looking at the furniture.

I love furniture! I even have a few pieces in our storage shed because I love them but don't have room in our current house. I love to get banged up pieces and make them beautiful again! I love it!

So, in looking in the furniture department I found an old wooden desk. I was talking to David on the phone when I spotted it and I said something about loving it and that I was wanting to get a new desk. Then I paid for my stuff and left.

That was a Friday, then Monday David says he wants to go look at Goodwill. That's not unusual, when I go without him and find some stuff, he usually wants to go and look too. We couldn't go Monday for some reason so we went Tuesday night. After looking around for a while he asks where the desk is that I liked. So I showed him and he asked if I wanted it. He wanted to get it for me as an early birthday present.

I said yes so he went to find the manager to talk price. Turns out it was half off that week. We brought that baby home for $35! WOO-HOO!!!

I have been feeling the need to change my desk situation since Christmas. I've changed the way I scrapbook so what was once a mainly scrapbook desk set-up was turning into a sewing, crafty, scrapbook set-up. So it just wasn't working. It looked cluttered all the time which drove me crazy! And it just didn't have very much surface room considering how much space it took up.

Here's my before pics of the desk set-up.

The desk itself didn't have any storage so I had to keep adding when I needed to and it ended up looking cluttered to me.
Here's my new desk.

It's hard to see in the pics but the desk has 3 drawers on the left and 2 on the right and both sides have a little pull out surface which gives me even more usable space. The desk is very beefy and took both David and our good friend "Mr. K" and taking the legs off and the drawers out. I think I can use it as a tornado shelter!

It is in need of some love. The top has scratches and it just looks tired. I'd like to paint it and change out the hardware but not right now. For now I'm going to live with it and see what inspires me.

Because of the storage in the desk it looks WAY less cluttered to me. I had to keep the little white cabinet but I hope to replace it someday with a kitchen base cabinet with doors and more storage. But it works for now. If I can keep Trey out of the lazy susan thingy!

I wanted some brighter colors in the area so I went through my stash of scrapbook papers and pulled out some that I just loved and hung them up. A little bit of summer and inspiration! I love it and plan to enjoy it!

Comments make me Happy!

Tuesday, June 21, 2011

My Long Weekend

Yesterday was my birthday so I had a long weekend of celebrating with friends and family. I went out to eat a few times at nice places, you know not Chili's! I got to see a movie, Green Lantern. I got to go shopping and I got to hang out and relax. I had a great weekend.

I wanted to show off something I got this weekend with some birthday money.
I went by Joann's to look at fabric and found a bunch that I needed to bring home. The top pile is for playing with and to have on hand. The bottom pile is for specific projects which I'll share as they are done. I really put the guy cutting fabric through his paces with this pile! I think the people behind me in line hated me!

I'm excited to get sewing and play with my new fabric! I'm going to be doing some looking around online for some fun projects! Happy Birthday to me!

On another note, I have some more projects to show off soon and I'm going to start a vitamin and mineral series as well. More on that one sometime this week.

Comments make me Happy!

Thursday, June 16, 2011

So, I walked into Goodwill

So, a couple of weeks ago Trey and I went to our local Goodwill. Sometimes I just want to look around and see what cool things I can find. I had a few bucks so I was ready.

I love the housewares area the most and then the furniture and then the clothes. The housewares has the most variety of stuff. If you don't go then here's what you do, or at least what I do. I look through everything. Sometimes you find stuff that's good just the way it is but a lot of times you have to look at something and see it from a different perspective. You can't judge something by it's color, because almost everything can be painted! And forget it's original purpose, some stuff can be used in a totally different way (and get painted) for a whole new life.

So, I found a couple of small things but I was really on the look out for a large frame (more on why later). I was looking through the bin that had some large pictures and pulled out this mountain scape painting. And I mean painting, like on a canvas and it was framed in this wood frame. I didn't think the frame was big enough for what I wanted so I put it back. But then remembered that David loves the mountains lately so I texted him a pic of it to see if he wanted it. I didn't think he would but I thought I'd check. Turns out he loved it! So, for $10 (not counting the discount) I brought it home.

Ok, so I wanted a frame because I wanted to make a chalkboard for our kitchen/dinning room. We have this awkward little hallway that connects our connected kitchen and dinning room (I know it sounds crazy but that's what it is). Anyway, I wanted to find a big old frame that I could paint and turn into a chalkboard. I didn't want to pay much for the frame so I kept looking at Goodwill. Oh and it needed to be chunky, I didn't care what finish it had because I was going to paint it.

So I hung the newly found painting frame on the wall to see if it was the right size (we want to re frame the painting, the frame is ugly) and it was! I was so HAPPY! For less than $5 (it was $10 but David got the painting and I got the frame, so it's split) I got a big frame that I'd have paid more than $20 for at like Hobby Lobby. I also had this bare wood 12x12 frame from HL ($5 thanks to 50% off) and I wanted to put it in the kitchen too.

Here's a close up of the frame. I like the chunkiness of it and a little white linen border.

So, I needed to prime them since I was painting them white and one was bare wood and the other a dark wood. I had some Kilz in a spray can so I used that. It's so much faster and easier. I didn't tape off the linen border because I didn't care whether it stayed the same or not.


The linen border basically stayed the same, it didn't look painted. So I brushed on the white and then used a stiff brush to clean up the linen boarder. Then hung them up in the kitchen! The chalkboard frame isn't completed yet but I hung the frame anyway. I'll share how that goes when I get it done.
I don't have any specific plans for this frame right now, so I just put a piece of scrapbook paper in it that I'm using as color inspiration for the kitchen/dinning room.
Here's a close up of the finished frame with linen border.
Here's the frame hung in it's new spot in the crazy little hallway.
I'm hoping to get the chalkboard part done soon and then I can share it with all of you!

Comments make me Happy!
Related Posts Plugin for WordPress, Blogger...