It's been a while since I've shown our master bedroom and I've made some changes lately. So, I'm here to show a couple.

Large print
I had a framed family picture by the chair and while I love the pic it was just too bland in this spot. I found a beautiful photograph on Pinterest and I loved the colors and I love nature pictures.
.JPG)
Anyway, about a couple of months ago I read somewhere that you could send your pics to Staples and they could make large prints for about $8. So, I checked into it and sure enough they do! I decided to do a 12x18 size print mounted which came to a whopping $13!
You just upload your photo to Staples.com (you want to print an oversized print) and pick which size you want and any add ons, like mounting or laminating and that's it! The base price is $8 for the smallest size and then it goes up from there. It takes about a day to get it printed and then you pick it up at the store (I think they have shipping options as well).
I love my print but I wanted to share some tips. First, make sure your pic can be enlarged to the size you want. This is always something I forget to consider when I enlarge pics. Mine did come out pixelated but it's only noticeable up close and due to the actual pic it works with it. So it doesn't bother me but I want others to know just in case you are like me and forget those things.
Second, the mounting is foam board. I knew that I didn't want to frame my print and wanted it to look like it was on a canvas. So, I ordered the mounting not knowing exactly what that would be. The foam works for me and I used some Velcro strips to hang it on the wall. And speaking of Velcro strips, they were mostly a bust for me. I guess they don't like my textured walls because the adhesive never sticks to my walls. So, we got all redneck around here and I used a nail poked through the Velcro strip that's supposed to stick to the wall, then hung the print.
Hanging Light


A few months ago I decided that I wanted a better light situation by the chair. I had a small table lamp but the whole corner looked short and had no height. And the lamp was lacking. I wanted a floor lamp that would sit behind the chair and come up over it. Then I started pricing floor lamps. Right now $100+ for a lamp just isn't going to happen. So I started looking for other options and came across a tutorial for a hanging lamp. So I gathered my supplies and made one.
Here's the tutorial to make your own hanging lamp.
Just a few tips.
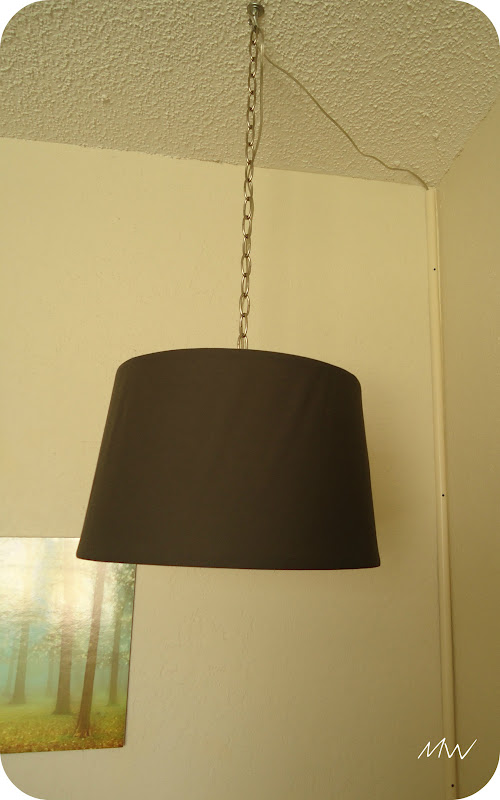
Be aware of where the crossbars on the lamp shade you choose. I bought a brown fabric shade from Target that had the crossbars in the middle of the shade and when I put the light bulb in, it poked out from under the shade. And I didn't like it, so I took the shade back and got a plain white one from Wal-mart with crossbars at the top.


Because I bought a white one, I wanted it to have a bit more to it, so I covered it with some simple quilting cotton in a charcoal grey. I really love the light, but I'm going to tell you to do as I say not as I did. I used some fabric glue to attach the fabric to the shade, which worked great. However I only glued the edges and where the fabric meets, I didn't adhere the body of the fabric to the shade. So, now I'm seeing some bubbles in the fabric. It's not extremely obvious but if I look at it closer it's noticeable. For now, it's not bothering me enough to redo it, but probably sometime down the road. And I also didn't pay attention to how it was finished on the inside of the shade, not remembering that it would be seen when hung. I'll fix that soon.
The other thing to consider is how the cord comes down your wall. This is how we cover cords in our house. And if you may have noticed in my pics that you can see the screws on the cover, that's because I haven't painted them yet because I'm going to be repainting the room soon.

So there are 2 bigish changes to our bedroom and we love them! David loves to sit in the chair at night and read and he loves the light over the chair. I love the print with the colors and personality. I'm anxious to add in some other colors to the room as well. I still have many more changes to make in here with the biggest one being a new color on the walls.
Comments make me Happy!

Large print
I had a framed family picture by the chair and while I love the pic it was just too bland in this spot. I found a beautiful photograph on Pinterest and I loved the colors and I love nature pictures.
.JPG)
Anyway, about a couple of months ago I read somewhere that you could send your pics to Staples and they could make large prints for about $8. So, I checked into it and sure enough they do! I decided to do a 12x18 size print mounted which came to a whopping $13!
You just upload your photo to Staples.com (you want to print an oversized print) and pick which size you want and any add ons, like mounting or laminating and that's it! The base price is $8 for the smallest size and then it goes up from there. It takes about a day to get it printed and then you pick it up at the store (I think they have shipping options as well).
I love my print but I wanted to share some tips. First, make sure your pic can be enlarged to the size you want. This is always something I forget to consider when I enlarge pics. Mine did come out pixelated but it's only noticeable up close and due to the actual pic it works with it. So it doesn't bother me but I want others to know just in case you are like me and forget those things.
Second, the mounting is foam board. I knew that I didn't want to frame my print and wanted it to look like it was on a canvas. So, I ordered the mounting not knowing exactly what that would be. The foam works for me and I used some Velcro strips to hang it on the wall. And speaking of Velcro strips, they were mostly a bust for me. I guess they don't like my textured walls because the adhesive never sticks to my walls. So, we got all redneck around here and I used a nail poked through the Velcro strip that's supposed to stick to the wall, then hung the print.
Hanging Light

A few months ago I decided that I wanted a better light situation by the chair. I had a small table lamp but the whole corner looked short and had no height. And the lamp was lacking. I wanted a floor lamp that would sit behind the chair and come up over it. Then I started pricing floor lamps. Right now $100+ for a lamp just isn't going to happen. So I started looking for other options and came across a tutorial for a hanging lamp. So I gathered my supplies and made one.
Here's the tutorial to make your own hanging lamp.
Be aware of where the crossbars on the lamp shade you choose. I bought a brown fabric shade from Target that had the crossbars in the middle of the shade and when I put the light bulb in, it poked out from under the shade. And I didn't like it, so I took the shade back and got a plain white one from Wal-mart with crossbars at the top.


Because I bought a white one, I wanted it to have a bit more to it, so I covered it with some simple quilting cotton in a charcoal grey. I really love the light, but I'm going to tell you to do as I say not as I did. I used some fabric glue to attach the fabric to the shade, which worked great. However I only glued the edges and where the fabric meets, I didn't adhere the body of the fabric to the shade. So, now I'm seeing some bubbles in the fabric. It's not extremely obvious but if I look at it closer it's noticeable. For now, it's not bothering me enough to redo it, but probably sometime down the road. And I also didn't pay attention to how it was finished on the inside of the shade, not remembering that it would be seen when hung. I'll fix that soon.
The other thing to consider is how the cord comes down your wall. This is how we cover cords in our house. And if you may have noticed in my pics that you can see the screws on the cover, that's because I haven't painted them yet because I'm going to be repainting the room soon.

So there are 2 bigish changes to our bedroom and we love them! David loves to sit in the chair at night and read and he loves the light over the chair. I love the print with the colors and personality. I'm anxious to add in some other colors to the room as well. I still have many more changes to make in here with the biggest one being a new color on the walls.
Comments make me Happy!
No comments:
Post a Comment[Reply to comment]
Please leave a comment, I'd love to hear from you!
I will respond to questions in the comments, Thanks!