Showing posts with label Bargains/Goodwill. Show all posts

Monday, July 30, 2012

Need Help with Decorating or Organizing?

 I love the process of decorating, the brainstorming, figuring out how to accomplish it, shopping (home or stores), executing it and enjoying it. I know there are some out there think this is a frivolous activity, not worthwhile, etc., but I disagree. This is a creative outlet, a form of art for me. I also like to take care of the home I've been blessed with. I am happier when my home is in order and a relaxing place to be. And I love beauty and since I'm a SAHM this is where I spend the most time and I want it to be beautiful.

While I love decorating my home and sharing the process here for everyone to see, it's started to not be enough. I've been spending some time lately helping my mom decorate her home. After 30+ years with children at home and most of her furniture and pictures and decorations worn or out of date, she needed help. I've had the time and an eye for decorating (I am by no means on par with the professionals!), so we've been shopping and brainstorming as she's had money (no kids at home = $$)
I 've really enjoyed the process with her. I'll suggest ideas and we go from there, seeing what she's drawn to and talking about the where or how.

Decorating and organizing are things I'm passionate about and they go hand in hand. But I love to focus on bargain decorating and organizing. I don't spend thousands of dollars working on my home, I look for inexpensive ways to get what I want: painting, hand-me-downs, Craigslist, Goodwill, shopping my own home, garage sales and saving up for bigger items.

So, all of that said, I'd like to offer my help to anyone out there. I want to help others that have no idea where to start or need someone to throw out ideas. I want to share inexpensive ideas that I've used to make my home what I want it to be, beautiful, comfortable, relaxing and just our style.
This offer is FREE!

If you would like my help with decorating a room or organizing a space, please email me at: marixawillis@gmaiil.com and send some pictures of your space and some info.

As I get some emails, I'll share ideas here and, with consent, share spaces.

If you have questions about specific problems feel free to comment or email and I'll work on answering those questions to help.

Comments make me Happy!

Monday, July 23, 2012

Master Bedroom Finished!!!

I left off with freshly painted walls. And I've since done what feels like a million things to get it finished.

I'm just going to take you around the room and explain what I did.
-Vanity wall-
I recovered the vanity bench.
I spray painted the handles on the vanity drawers. I didn't care for the brassy dark original handles and the pulls aren't a standard size so I either needed to do a special order (=$$$) or spray paint. I'm not in love with how they turned out but I can live with it until I want to pay for new ones.
I painted the jewelry box the same color as the dresser (more on that in a minute).


I painted/stained the small table. I've seen this look on blogs and pinterest and really loved it and wanted to try it out. The table top was in great shape but the color was a bit too orangy/red. I sanded the top until all the old finish was gone. Then I taped off/bagged the top and sprayed the base white and then stained the top. When it was dry I waxed the top to protect it. I LOVE IT!
I added ribbon on the inside of the lampshade to cover the unfinished edges and give it a little something. It's very subtle but I like it.
I sewed a new pillow cover. I went through a few fabrics trying to find the right amount of pattern but one that wasn't overwhelming in the soft atmosphere I'd created. I think this one is just right.


-Dresser Wall-

This dresser has been a pain in the butt since we've had it. It's a family piece but I don't like the shape of it and those bottom drawers a a royal pain to paint. Add to that I repainted it only a year ago and I hated it and was dreading another repaint. (I've painted this dresser 5 times total in 12 years....) Up till the week before I was going to paint it, I wanted it a dark teal color but I saw a paint chip in this green and knew it was the one. I knew it would play off the wall color beautifully and I'm actually in love with this dresser! And the glass knobs from Hobby Lobby are perfect! I've painted furniture for many years but never the correct way. This time I was determined to do it right. Sanded most of the last color off, patched, primed, painted coat 1 & 2, waxed for protection and not rushing through steps. I allowed adequate cure time and it made all the difference! I also used Sherwin Williams paint which was recommend and I was very pleased with it.
This is the tutorial I followed on how to paint furniture.

The pearly vase I got at Target after looking at it every time I went in, and convincing my mom to buy it as well! I love it!
The wood tray I found at Goodwill. I have no idea what it really is but this is how I'm using it!
The blue bowl I found at TJ Maxx.
I added ribbon trim to the plant cover.
After seeing the dresser dressed up, I nixxed the electronic cover. I got a smaller, cream colored clock and arranged everything so it looked better. I absolutely LOVE looking at this area when I'm in bed.


-Bed Wall-
I painted the nightstands at the same time I did the dresser (it was a long week....). And I'm very pleased with how they turned out as well!
This one is mine, I have a basket of oils and a container of granola (for before bed!)
The lamps are the same but I covered the shades and added ribbon trim. If you look too close they look a bit questionable and at night when they are one the original design on the shades shines through but I don't care. Until I'm ready to track down and pay for new shades these will do just fine!
I made new pillow shams with this fabric that drove the color pallet.
I made a newish bed skirt. I took my old one and cut the brown fabric off (after measuring it for the new). Then sewed on new panels using a Walmart twin sheet (the same as the liner fabric on my curtains).
The green throw pillow is one I already had around the house. I was having a hard time finding a fabric/pillow that I liked and looked good so this is taking the spot for now.

-art wall-

These pics are hard to photograph, so sorry for the glares and weird angles. This is what's on the wall on the window wall. The big pic was taken almost 2 years ago but it's a great one. The other is a wedding photo that I turned black and white. The small frame on top is a Wordle that I created using words that are meaningful to us, printed on some blue card stock. The frame on the right is lyrics from a song David wrote me for our 10th anniversary.

Before and Afters


Amazing how much brighter, more life is in this room now!

I am SO happy with how the room evolved and I love it! This time, I took my time and tackled one thing at a time and then evaluated it adjusting things as I went. I LOVE it! It's soft, relaxing, light, beautiful and comfortable. It's a HUGE change from where I started. And David loves it too!

Comments make me Happy!

Thursday, July 19, 2012

Trey's Play Kitchen

So, last Christmas I was reading Young House Love, on of my blogs, and they had made their daughter a play kitchen for Christmas. I loved how theirs turned out and told David that it would be great to do for Trey for his birthday. I pinned it and then in May we started talking about it again.

Trey LOVES to help Daddy in the kitchen and often wants to play with his tools, bowls and utensils. He had a few things but given his love for "cookin stuff" we really loved the idea of making him his own kitchen.

Now I realize we could have gone to Toys R Us and picked up the only non-girly plastic kitchen and he would have loved it just the same but I wouldn't have. I have a serious dislike for plastic toys. I wanted this kitchen to last through many children and be durable and well, look good.

Here's how it turned out.

We followed the tutorial (linked above) and went to our local Habitat for Humanity Resale Store and I found this cabinet. This was the only one that had enough space to work, wasn't too big and didn't cost me too much.
You can see the scale here and we flipped the thing over, because it made more sense to us.
We used scraps of stuff we had on hand: plywood, 2x4's, wood knobs, hook, paint and trim. We bought: lots of screws the correct length, plexi glass, a trivet turned stove top, wire racks and other misc hardware.


I also used a pencil/pen holder I had that wasn't being used and sprayed it blue to use as a utensil holder and I had an old wood cutting board that was my grandmother's. I just sanded it down and oiled it to make it look better. The hook on the side was an old brass one I had that got sprayed red along with the knobs that my friend gave me from an old project of hers.

So that's what we did and if you want the full run down on how to make one yourself, check out their tutorial.

To outfit this kitchen we visited our local Dollar Tree to get him real cooking supplies: brownie pan, pie pan, muffin pan, measuring cups and utensils. The skillet and small pot with lid came from our Chinese grocery store which carries restaurant supplies, so they are real, sturdy and they were inexpensive. The timer was from Ikea.

The dishes were mine as a child and still work great even if strawberries aren't quite in style with 4 year old boys! They will work for now and I love watching him play with something I played with. The food and birthday cake were a birthday present. They are wood pieces and has real food similar to what we eat. I noticed that other plastic sets of food included tons of junk food like boxed meals, donuts and other things we don't eat. So I like that he's playing with things we eat.

Here's how it looks in his room.

I still need to get something on that wall! I'll get to it eventually!

I'm showing this again to show that I made some new curtains for the window. It used to have some blinds and a sort of valance. I loved the fabric that was on the valance but the room needed a change. I am starting to hate blinds and I was noticing that this room gets a LOT of morning light. So we needed some curtains that blocked that. Taking the blinds out let in more light, which I love during the day, and I can see the yard better.

So there's Trey's 4th birthday gift from us. We had a blast creating it especially when it came to all the details. It's not perfect but we're ok with that and he LOVES it which is what really matters!

Comments make me Happy!


Thursday, April 5, 2012

Hanging Light & a Large Print

It's been a while since I've shown our master bedroom and I've made some changes lately. So, I'm here to show a couple.

Large print
 I had a framed family picture by the chair and while I love the pic it was just too bland in this spot. I found a beautiful photograph on Pinterest and I loved the colors and I love nature pictures.

Anyway, about a couple of months ago I read somewhere that you could send your pics to Staples and they could make large prints for about $8. So, I checked into it and sure enough they do! I decided to do a 12x18 size print mounted which came to a whopping $13!

You just upload your photo to Staples.com (you want to print an oversized print) and pick which size you want and any add ons, like mounting or laminating and that's it! The base price is $8 for the smallest size and then it goes up from there.  It takes about a day to get it printed and then you pick it up at the store (I think they have shipping options as well).

I love my print but I wanted to share some tips. First, make sure your pic can be enlarged to the size you want. This is always something I forget to consider when I enlarge pics. Mine did come out pixelated but it's only noticeable up close and due to the actual pic it works with it. So it doesn't bother me but I want others to know just in case you are like me and forget those things.

Second, the mounting is foam board. I knew that I didn't want to frame my print and wanted it to look like it was on a canvas. So, I ordered the mounting not knowing exactly what that would be. The foam works for me and I used some Velcro strips to hang it on the wall. And speaking of Velcro strips, they were mostly a bust for me. I guess they don't like my textured walls because the adhesive never sticks to my walls. So, we got all redneck around here and I used a nail poked through the Velcro strip that's supposed to stick to the wall, then hung the print.

Hanging Light


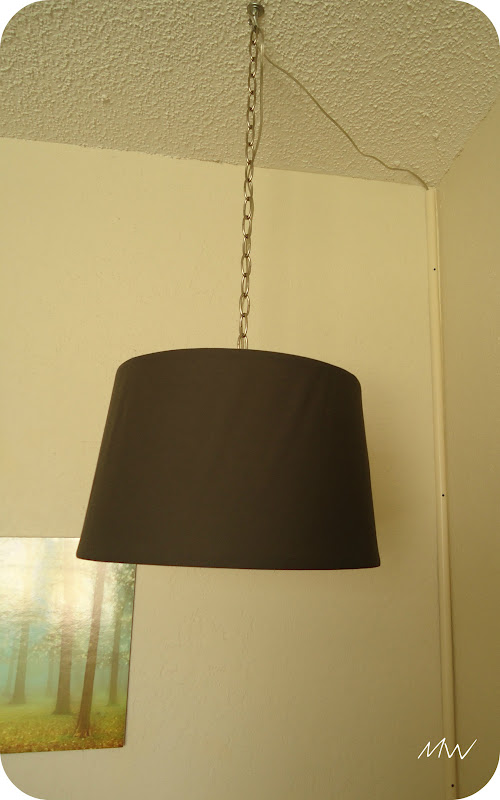
A few months ago I decided that I wanted a better light situation by the chair. I had a small table lamp but the whole corner looked short and had no height. And the lamp was lacking. I wanted a floor lamp that would sit behind the chair and come up over it. Then I started pricing floor lamps. Right now $100+ for a lamp just isn't going to happen. So I started looking for other options and came across a tutorial for a hanging lamp. So I gathered my supplies and made one.

Here's the tutorial to make your own hanging lamp.

Just a few tips.
Be aware of where the crossbars on the lamp shade you choose. I bought a brown fabric shade from Target that had the crossbars in the middle of the shade and when I put the light bulb in, it poked out from under the shade. And I didn't like it, so I took the shade back and got a plain white one from Wal-mart with crossbars at the top.


Because I bought a white one, I wanted it to have a bit more to it, so I covered it with some simple quilting cotton in a charcoal grey. I really love the light, but I'm going to tell you to do as I say not as I did. I used some fabric glue to attach the fabric to the shade, which worked great. However I only glued the edges and where the fabric meets, I didn't adhere the body of the fabric to the shade. So, now I'm seeing some bubbles in the fabric. It's not extremely obvious but if I look at it closer it's noticeable. For now, it's not bothering me enough to redo it, but probably sometime down the road. And I also didn't pay attention to how it was finished on the inside of the shade, not remembering that it would be seen when hung. I'll fix that soon.

The other thing to consider is how the cord comes down your wall. This is how we cover cords in our house. And if you may have noticed in my pics that you can see the screws on the cover, that's because I haven't painted them yet because I'm going to be repainting the room soon.


So there are 2 bigish changes to our bedroom and we love them! David loves to sit in the chair at night and read and he loves the light over the chair. I love the print with the colors and personality. I'm anxious to add in some other colors to the room as well. I still have many more changes to make in here with the biggest one being a new color on the walls.

Comments make me Happy!

Tuesday, February 7, 2012

Clothes Deals at Goodwill

If you've been reading long you know that I love Goodwill. I've bought so many great things at great prices there over the years. And clothes have been no exception.

A few weeks ago David and I were in the mood to go looking around Goodwill. We weren't after anything in particular but just like to look around. I like the housewares, furniture and clothes. David likes the books, electronics and clothes. Trey likes the toys!

So, we head in and I'm drawn to the clothes. I really love the way my local Goodwill's organize the clothes, it works with the way I think. They put all the women's sleeveless shirts together and then by color. Then the women's short-sleeve tops together by color and so on. So I can easily just look for the kind of top/bottom I want and then look at the colors I'm interested in. I love it.

Well after a while of looking at jeans and other random stuff, I walked the skirt rack and 2 caught my eye. They had great colors and patterns. One was marked my size the other a little bigger. We were getting ready to check out when I noticed them so I didn't try them on. I figured if they were too small or didn't look right I'd just use the fabric for something else. So we bought them.


Then the next weekend we had the itch to go back to Goodwill, only this time a different one. I went straight for the clothes and started pulling tops in colors I liked/looked good on me. Of course I grabbed more than I thought I'd get because after trying stuff on you usually weed through the pile. I took 7 tops in and all of them I liked/fit! And they were all very comfy.  I was surprised that they all worked. This isn't always the case but you embrace it when it happens. So we bought them.


So, I had 2 skirts, 4 tank/sleeveless and 3 t-shirt tops. After trying everything on, I needed to alter both skirts, the pink tank, teal tank and teal shirt. I felt pretty confident in taking on these alterations since they were pretty basic. Skirt #1 was too long. Skirt #2 was too wide. Both the teal tank & teal shirt were too long and the pink tank was too wide.


With the help of my new serger I altered all my new clothes to my liking. I was SO excited that I was able to do all of this all by myself. And with a little help from the manual! I'd tried shortening some tops last year just using my sewing machine but I wasn't happy with the results. They were mostly knits with some stretch and when I hemmed them they puckered or the stitch would break. I know you can use a zig-zag stitch to help with stretch but I didn't like the look. This is one reason I asked for a serger for Christmas. I love that I was able to take at least 2 items that were sized too big for me and make them my size.

This thing worked beautifully! I'm VERY happy with my results and I'm now working on making some skirts and dresses using my serger. I'm enjoying learning how to make clothes.

Oh, and in case you are wondering most of these items are name brand pieces.
Pink tank- Jones New York
Green tank- Mossimo (Target)
Turq. tank- Old Navy
Teal tank- Ann Taylor
Pink tee- Gap
Teal tee- Apt 9 (Kohls)
Purple tee- Eddie Bauer
Skirts were brands I've never heard of.

Oh, and I got all of this for about $35. I LOVE GOODWILL!

In case you aren't familiar with Goodwill here's some tips.
Don't expect to find great deals every time. Some times you score big sometimes there's nothing good. Items are donated so the supply is constantly changing and that's what makes it so fun! Although I've seen many items with their original price tags on them, often from the original store that just needed to get rid of the items. So they are in great shape for fractions of the price.

Be open to finding diamonds in the rough. You have to search and look and try things on. I don't only buy clothes, I find decorative items for my home and sometimes furniture too. Be willing to look. Clothes can be altered, items can be painted or cleaned up, furniture can be refinished, fixed, altered and painted.

Give yourself time to look. If you are in a hurry you won't find as much.

The Oklahoma Goodwill's offer a discount card for each calendar year. It's about $5 for card and every time you use it they take 10% off your order. And around here that's more than sales tax. If you shop there often it's worth it to get the discount card.

So there's my story of my latest score from Goodwill.

If you shop Goodwill or thrift stores tell me what you get. Any awesome deals?  Please share!

Comments make me Happy!

Thursday, February 2, 2012

Trey's Room Reveal!!!

Ok, I'm laughing a little at the title, the exclamation marks make it seem like a really huge, big deal. So, here's the room.

So, I talked last time about all the furniture moving that happened right after Christmas. I was finally able to work on and finish the details of Trey's room. This was a lot of fun! I spent a few weeks working out the details of what I wanted it to look like and what I needed to make it happen. This is going to be a long post with lots of pics but I wanted to show you everything. So, here we go!

Pictures/Art
In Trey's room before I'd had a small gallery wall of frames. While I liked the idea the black frames weren't going to work for what I wanted. I wanted light and bright, big surprise! I found my tastes moving more toward light colors, white and simple decor.

So, I spent about a week painting all the old frames and some others I'd picked up at Goodwill (another big surprise!). I had to prime them and then paint them. I could have knocked it out a lot faster by spray painting them but I had all the paint, so I went for free and time consuming.

After the frames were dry I started looking for stuff to put in them. I didn't want just pics like I had last time, I wanted a few pics, some art and whatever I liked. I found a blog that has free printable's that I loved! I loved that they were kid oriented but with softer colors and fun designs. I also knew I wanted to include his hand and foot prints done when he was a month old and his 3yr old hand print (I do a hand print every year around his birthday). Here's what I ended up with.

Starting on the top left: I made this on the computer, it's all Trey's birth stats. This was cut on my new Cameo machine, it's just a star that I really liked. Trey's hand and foot prints from a month old. This is a free printable from this site (they have a girl version too). This frame has been recycled many times, I didn't have anything good to put in the small mat openings so I just cut out his name with the Cameo.
Bottom Row: This pic is over a year old but I love it, the mat was a Christmas gift from my parents. It's a wood cutout, that I painted white. This is a free printable from the blog I mentioned above. His 3year old hand print, which I'll just change out every year. The blue is another design cut from my Cameo. And lastly is a family pic when Trey was about 4mo. old and still a favorite.

All frames were Goodwill finds except for the 2 holding his hand and foot prints, those were some old ones we already had. I love how this wall turned out! I like that I'll be able to add to it as I want/need by going up and side to side. I know it's a bit symmetrical but that's just who I am. The different frames offers that bit of character, while all being the same color keeps the unity.

Shelves/Decor
Like I mentioned in the last post, this dresser was moved to this spot to make room for the bed. The wall originally had a recliner and 2 black shelves. I'd seen several blogs with these great white modern wall shelves. They were from Ikea, so I thought I could order them online (the nearest store is 4hours away) but for some reason they don't sell them online only in store. And it wasn't worth the trip for $40.
BUT, I did find these at Target and they are very similar to what I liked at Ikea and for less money. I got 2 for $22! I put one on each side of the window for balance and to keep things simple. On the left side of the window I originally had one shelf.
The frames on each shelf are from Walmart, which I love! And they were already white so no painting! The printable's are from the blog mentioned above. I love how they look in the frames!

On the right side of the window with the dresser I have Trey's dinosaur piggy bank that David picked up for him a couple of years ago. The frame is Goodwill, painted, with a printable in it. She had numbers 1-10, so I picked 3 since he's 3. I'll print out a 4 for his birthday just to keep things fresh.

On the shelf is a ceramic turtle with moving head, tail, legs. My youngest sister got it on a mission trip (can't remember from where). The helicopter is from Hobby Lobby already painted. I just liked the colors and I love aircraft. The drum is from another sister on returning from Uganda on a mission trip.


On the left side of the window. The figurine was a baby shower gift, because I loved it! One of my sisters took a pottery class and made this for Trey. Below it is a tile that all 3 of my sisters went in together to get as a shower gift. It's heavy and I finally got it hung up. I used 2 plate hangers from Hobby Lobby and spray painted the tips with oil rubbed bronze. I don't care for the brass look. Anyway, I love the tile and it looks great under the shelf.
Under the shelf/tile is a rocking horse from David's parents.

Chair
If you read the last post you would have seen the before pics of this chair. I bought this old dinning room chair from a thrift store or Goodwill (can't remember) about 8-10 years ago. I loved the wood and so I just recovered it. Well for a few years it's been in the shed as I didn't have room for it anywhere. After taking the recliner out I figured I needed a chair in here.

So, I decided to paint and recover it. Unfortunately it wasn't as cheap as I was hoping but it was still cheaper than buying another chair. It took 3 cans of white spray paint to get it covered! And the first can was a paint/primer. Ugh!

When the chair was finally done and dry, I started pulling fabrics that I already had on hand to see what looked best in the room. I ended up liking this one the best. Oh and it was a pillow sham I'd found at Goodwill (shocked aren't you?!) several months ago. It was Target brand, so no wonder I liked it!

I am really pleased with how it turned out, even with some imperfections.

I thought it could use a pillow on it to make it just a bit more comfy, so I swiped this off of our bed. I thought about recovering it but I didn't like anything else with the seat fabric so I kept it as is.


Bed
As I mentioned in the last post, the bed was a hand-me-down from my parents, which was probably mine from high school. It's not a style I'd go out and pay for but for free it works just fine. We didn't have any bedding so I've been working on getting some at a discount price. I picked up the sheets and mattress pad at Target then got stuck on the comforter.

I have a dislike for themed kids rooms. I don't do characters. So finding a comforter for his bed that didn't have characters for a cheap price was hard. I finally landed on a plain white fake down comforter from Target for $25, which was a good price for any comforter in a twin size.

I knew I wanted a duvet cover even before finding a comforter. I picked up 2 flat sheets from Walmart for $6ea, one in navy and one polka dots in navy, teal and blue on a white background. Then I layed the navy one on the floor, then added the comforter, then the polka dot to see how it fit. Thankfully I didn't have to cut anything and just sewed the 2 sheets together on 3 sides leaving it open where the cuffs are on the sheets. I didn't add a closure but I might do buttons in the future.
You can see all 3 layers in this pic.

I also needed a bed skirt because I was using all that wonderful space under the bed for storage and want it covered. So, I picked up another $6 sheet from Walmart. I measured the 2 sides I needed covered and then cut the sheet to give me 2 panels. I hemmed all the edges up, then sewed some Velcro to the panels. 5 pieces for the long one and 4 for the short one. Then I held the panels up to the bed to figure out where the Velcro mate needed to go on the bed and hot glued it in place. This worked great, because the pieces will come off easily if I peel it off, but if I pull the skirt off they stay in place.

I was very happy with this set up because I didn't use a bunch of fabric under the mattress as a normal bed skirt has, and I can easily pull a panel off the bed to wash as needed. LOVE it!
Yes, the wall over the bed is empty. I have something I want to do there but I haven't worked it all out yet, so that will come later. The suspense!

All in all I am very happy with the way the room turned out. It makes me very happy to go in there and look around. I think that covers everything, this post is really long so if I forgot something or you want more info on something ask me in the comments. I'll leave you with a few more parting shots around the room.

That basket holds all his small toys. They were in an ottoman but they are easier to see and play with in this open basket (it's from Home Goods).


Comments make me Happy!
Related Posts Plugin for WordPress, Blogger...