Wednesday, April 25, 2012

Front Porch Spruce Up Part 1

Our home has a covered walkway up to the porch which is also entirely covered. While I love our big porch it's kind of dark, especially with a dark door. We repainted our house last spring to a greyish-blue (although it looks more blue in the pics) and the porch area needed a spruce up.

I like everything here but I wasn't liking the colors. I want all the colors to coordinate with the house color and be a more cohesive.
Here's a before pic of the whole porch.

The bench I've had for many years and is still in good shape but the finish wasn't. The table is a little metal table I got about 4 years ago and I like it the way it is (just needs to be cleaned up). I got the star about the same time as the table and it's a great red. The blue bottles are beer bottles that I love the color of.

The pillows are outside pillows and were red. I covered them with some left over outdoor fabric I had in my stash. They are kind of plain but I was thinking about stenciling them with some type of design, but I don't know what. Any suggestions?

So that's what I started with. Now here's what I did.

Painted the bench. I wanted to spray paint the bench because it would be SO much easier and faster to get it covered. It took 3 cans to get this sucker covered (not including the back which won't be seen). But I LOVE it! It's fresh and pretty and modernized.

The table I decided to keep as is and just clean it up. It's a light weight metal (tin?) and the color works well with all the blues. And the bottles will stay for a while.

Next I sprayed the star. The star has some great designs on it and I worried that once I painted it the designs wouldn't show.
You can kind of see the design in this pic. But after painting it I could still see the design.

The last thing I did was take an old plastic planter and spray it too. It came with our house and I've only used it a couple of times. It was a hunter green color and was faded, so it wasn't very pretty and not my style.

I also wanted to put it next to the walkway right by the porch and have a shade plant in it.This is how it turned out.


I'm not sure if the planter will stay where it is, depending on how the plant does where it is. But I like how the thing turned out. (the brown smudges are dirt)

Ok here's the finished pics.


Yes, Trey likes to "chalk" here!

Next episode I'll share about the front door.

Comments Make me Happy!

Monday, April 23, 2012

My New Vacuum: Eureka!

A couple of weeks ago we realized that we needed a new vacuum. I would have to empty the canister after each room because the filters would get so clogged. It sounds like we didn't vacuum much but it was a couple of times a week and it was clogged more than was necessary.

We would wash the filters out and it never felt like it was getting everything. And I was getting so frustrated with having to empty the canister so often. So we finally broke down and picked up a new one.

I'd love to say that I did research on vacuums and put a lot of thought into it but I didn't. We wanted to get one for about $100 so I headed to Lowe's first and found 2 in my price range to pick from. I can't remember the other one but this Eureka! looked very user friendly. So I got it and took it hone to test it out.

I immediately LOVED it! Not only did it feel like it was pulling up what my other one had been missing but it was fluffing the carpet. Our living room has fairly new carpet (4years) but in the bedrooms it's probably around 10yrs old.

When I vacuumed with the Eureka! in the bedrooms it was amazing! The carpet in the bedrooms had always been matted down with our other vacuum but the Eureka! fluffed it up so nice. Like dig our toes in nice. We were sold!

I in no way was paid or perked to write this post and I haven't tried a lot of other brands. But I wanted to share my experience with a vacuum that exceeded my expectations. This vacuum was $89.99 without tax at Lowe's.

Comments Make me Happy!

Thursday, April 12, 2012

Make up Brush Roll up

I'd been wanting to make a make up brush holder for a while and after reading some other tutorials I decided I could have a go on my own.

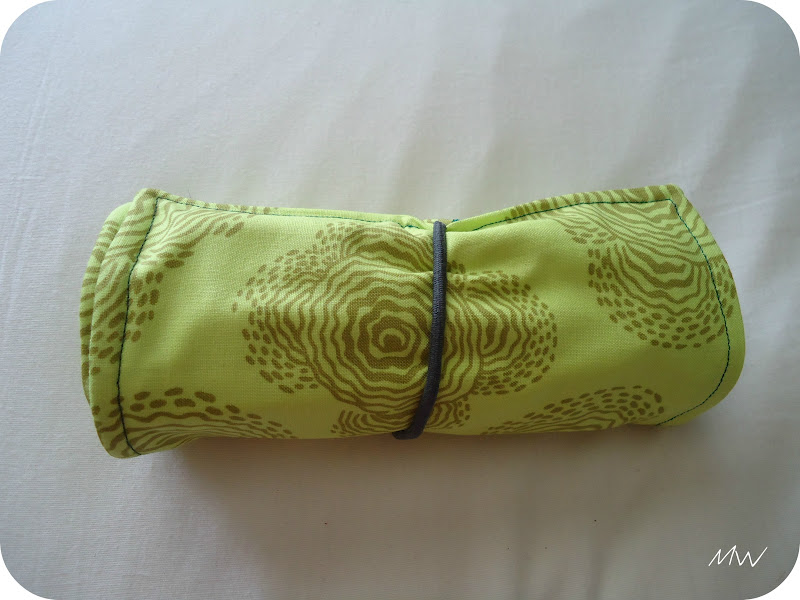
I grabbed all my brushes and anything else I wanted to be in the roll up and layed them out to get a rough idea of my measurements. I found 2 fabrics in my stash that I liked together and cut 2 pieces of the outside fabric and 1 of the inside (the other outside piece of fabric is the pocket). I cut them all the same size. The pocket piece I folded in half lengthwise so it would create a pocket when sewn to the inside fabric.

Oh, I also used a piece of quilting batting (felt would work too) to lay my pieces like this: batting, inside piece (face up), pocket piece (face up). Then I started laying out my brushes under the pocket to figure out how big to make each pocket. I tried to lay the brushes out like this: big, small, medium, big small, medium. I marked my lines and then sewed them. I went all the way to the top with my lines (instead of stopping at the pocket) just to give a little bit more interest. I also used a contrasting thread for interest as well.

After the pockets were sewn, I sewed my elastic hair band on by running about 15 stitches over it. (the hair band is to use to hold the roll up closed) Next I layed the outside piece on top of the pocket and pinned. I ran a stitch all the way around the piece leaving a 2-3inch opening (not where the band is).


Turn the piece right side out, I ironed all the edges flat and made sure they lined up. Then run a stitch all the way around (making sure to secure the hole). And you are done!


I love it! It's so pretty and so easy to use and my brushes stay cleaner this way.

Have you ever made a make up brush roll up? Are you going to now?

Comments make me Happy!

Monday, April 9, 2012

Small Projects

I've been working on a bunch of small projects lately, so I thought I'd share them all together.

Basket
This basket used to be in our kitchen/dinning room on the bar. We put our fresh produce in it, until one day I noticed that it was contributing to our kitchen feeling cluttered and made it hard to see David while he cooked as I sat in the dinning room. So, I found another basket around the house that has a low profile and we really liked how it looked.

I had an idea to use it in the hall bathroom on the back of the toilet, but I wanted it to look a bit like aged metal instead of a color. So, I sprayed it with black first but I allowed a bit of the turquoise to peek through. Then I lightly sprayed it with silver to give kind of a galvanized metal look. It's not an exact match but I'm pretty happy with how it turned out.

Right now it's holding extra toilet paper in the hall bathroom but once I redo the bathroom that may change. (I've already moved it to the master bathroom)

Faux Mercury Glass
Right before Christmas I saw on Pinterest how to spray paint glass to resemble mercury glass. So I sprayed some glass candle stick holders and while it's not exact, I do like how they turned out. I found another glass candle holder in my stash and decided to paint it too.


You could look around Pinterest or google it but basically you spray your clear glass item with water then while still wet you spray paint the object with Krylon's Looking Glass. I could only find mine at Wal-mart for about $8 and it's a small can.

I do love how they turned out.

So, those are my small projects lately.
Have you ever used the Looking Glass spray paint before and if so what did you paint?

Comments make me Happy!

Thursday, April 5, 2012

Hanging Light & a Large Print

It's been a while since I've shown our master bedroom and I've made some changes lately. So, I'm here to show a couple.

Large print
 I had a framed family picture by the chair and while I love the pic it was just too bland in this spot. I found a beautiful photograph on Pinterest and I loved the colors and I love nature pictures.

Anyway, about a couple of months ago I read somewhere that you could send your pics to Staples and they could make large prints for about $8. So, I checked into it and sure enough they do! I decided to do a 12x18 size print mounted which came to a whopping $13!

You just upload your photo to Staples.com (you want to print an oversized print) and pick which size you want and any add ons, like mounting or laminating and that's it! The base price is $8 for the smallest size and then it goes up from there.  It takes about a day to get it printed and then you pick it up at the store (I think they have shipping options as well).

I love my print but I wanted to share some tips. First, make sure your pic can be enlarged to the size you want. This is always something I forget to consider when I enlarge pics. Mine did come out pixelated but it's only noticeable up close and due to the actual pic it works with it. So it doesn't bother me but I want others to know just in case you are like me and forget those things.

Second, the mounting is foam board. I knew that I didn't want to frame my print and wanted it to look like it was on a canvas. So, I ordered the mounting not knowing exactly what that would be. The foam works for me and I used some Velcro strips to hang it on the wall. And speaking of Velcro strips, they were mostly a bust for me. I guess they don't like my textured walls because the adhesive never sticks to my walls. So, we got all redneck around here and I used a nail poked through the Velcro strip that's supposed to stick to the wall, then hung the print.

Hanging Light


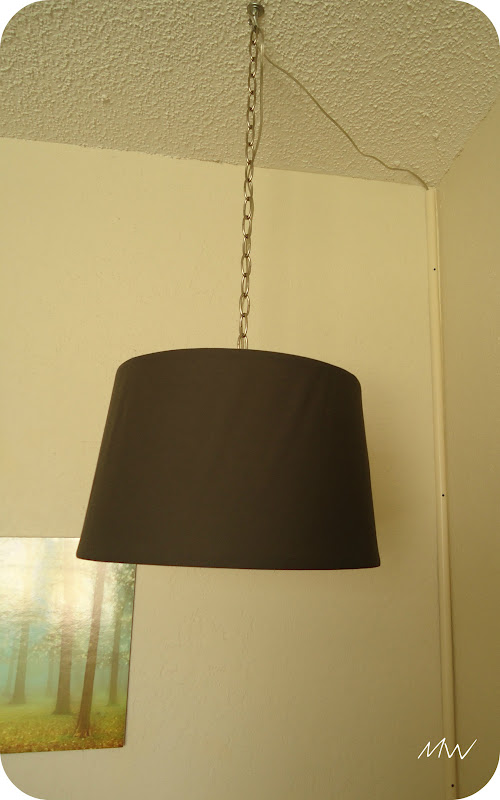
A few months ago I decided that I wanted a better light situation by the chair. I had a small table lamp but the whole corner looked short and had no height. And the lamp was lacking. I wanted a floor lamp that would sit behind the chair and come up over it. Then I started pricing floor lamps. Right now $100+ for a lamp just isn't going to happen. So I started looking for other options and came across a tutorial for a hanging lamp. So I gathered my supplies and made one.

Here's the tutorial to make your own hanging lamp.

Just a few tips.
Be aware of where the crossbars on the lamp shade you choose. I bought a brown fabric shade from Target that had the crossbars in the middle of the shade and when I put the light bulb in, it poked out from under the shade. And I didn't like it, so I took the shade back and got a plain white one from Wal-mart with crossbars at the top.


Because I bought a white one, I wanted it to have a bit more to it, so I covered it with some simple quilting cotton in a charcoal grey. I really love the light, but I'm going to tell you to do as I say not as I did. I used some fabric glue to attach the fabric to the shade, which worked great. However I only glued the edges and where the fabric meets, I didn't adhere the body of the fabric to the shade. So, now I'm seeing some bubbles in the fabric. It's not extremely obvious but if I look at it closer it's noticeable. For now, it's not bothering me enough to redo it, but probably sometime down the road. And I also didn't pay attention to how it was finished on the inside of the shade, not remembering that it would be seen when hung. I'll fix that soon.

The other thing to consider is how the cord comes down your wall. This is how we cover cords in our house. And if you may have noticed in my pics that you can see the screws on the cover, that's because I haven't painted them yet because I'm going to be repainting the room soon.


So there are 2 bigish changes to our bedroom and we love them! David loves to sit in the chair at night and read and he loves the light over the chair. I love the print with the colors and personality. I'm anxious to add in some other colors to the room as well. I still have many more changes to make in here with the biggest one being a new color on the walls.

Comments make me Happy!

Monday, April 2, 2012

Organizing DVD's Part 2

Ok, so I'm finally getting around to sharing the second part of how we are now organizing our DVD's. Here's Part 1.

So, when I left off, I was able to get them all into one drawer in the dresser but they weren't organized past that. After brainstorming a lot of ideas, we decided to go with photo boxes. The DVD sleeves fit just right within photo boxes that I picked up from Hobby Lobby (on sale of course).

I picked up 6 boxes because that's all that I could get into the drawer. I removed the lids, and just popped the sleeves in the boxes according to category. Our categories are: Man/Action, Family/Kid, Learning (LeapFrog, Curious George), Inspirational, Romance/Comedy, Classics and Christmas (all our seasons or boxed sets stay in their original packaging).

I then needed to make some labeled dividers. I used some large scrap pieces of cardstock cut to size, making sure they stuck up high enough to see the label. Then I used my Dymo labeler to make the labels and then I used packing tape to "laminate" the paper. It's nothing fancy but it works.


I still can't  believe I can get ALL of our DVD's in this one drawer with room to spare! The back middle box is pretty much empty ( I still need a few more sleeves for those last 6 DVD's ).


I have to say after using these sleeves for about a month, that I totally LOVE them! They are easy to use and easy to flip through to search. And of course hardly take up any room! LOVE them!!! And check out how thin they are.

So, that's the official how we organize our DVD's. How do you organize your DVD's?

Comments make me Happy!

Thursday, March 8, 2012

Healthy Waffle Recipe

Sorry I've been MIA lately, we've been hit by the flu and I haven't even touched my computer in days. I haven't had the flu since I was a kid so I'm having a harder time dealing with it. Thankfully David and Trey haven't been hit nearly as hard as I have been. I'm still not up to speed but at least I feel human again! Anyway on to the post.

I mentioned last week about starting to share some of our family recipes that we consider healthy. This recipe is fairly new for us maybe 2 months but we loved it immediately! For me waffles had always been bland which is probably why we smother them in syrup. But when I went off HFCS that meant no syrup for waffles and french toast. I'd never had real maple syrup before and was unsure if I'd like it. I finally broke down and bought some, yes it's more expensive but my health is worth it. I found I don't need as much maple syrup as I used to use of the HFCS syrups.

Then David found this recipe for waffles and they had so much flavor to them and knowing they had good stuff in them was even better! Without further ado, my sweet husband David.


I absolutely love breakfast food. However, I have a problem: I don’t like the feeling you get after you eat most of it. Eggs, sausage, bacon, French toast, pancakes, pizza, waffles, etc. They all taste great, but they are so heavy and most are full of stuff that just make you feel gross. Honestly, it really bums me out. Or, it did until I found some healthier versions of my favorite meals. Today’s example? Waffles.

I have always made waffles out of Bisquick. That is what I had seen done all my life and so I followed suit. All you needed was a couple cups of the miracle mix, some milk, eggs, and veggie oil, and viola…subpar waffles. I had an epiphany a couple of months ago. Bisquick is not something I need in my kitchen because it is made up of stuff that I already have in the pantry; flour, baking soda, and baking powder. Nothing against Bisquick, but if I already have the stuff in the pantry, why do I need to go buy this box with the same stuff? Why do I need to follow their waffle recipe? What other good stuff could go in my waffles? It was time to chuck the Bisquick and find out.

Enter the new favorite in the Willis household: Whole Grain Waffles via the Food Network. Not only does it taste amazing, it does not leave you feeling like a grease ball blob when you have finished eating. It is filled with all kinds of good stuff: rolled oats, wheat germ, raw milk, unsalted butter, and more.

 The trick to these waffles is mixing the wet and dry ingredients separately at first. Then you fold the wet ingredients into the dry ones. If it is a little lumpy when you are done mixing it is ok. Then pour about half a cup of batter into your preheated waffle iron. Three minutes later pull it off the waffle iron, top it off with 100% maple syrup and you have a serious winner on your hands.

This waffle recipe has changed the way I think about some foods. Why is there a stigma about healthy ingredients? (Maybe it is just a stigma with us guys, you ladies seem to get it right more often than we do.) When you hear the words wheat germ what comes to mind? All I used to hear was the word germ. A few years ago had you suggested that I put rolled oats in my waffles I would have thought you were crazy. But, now that I have gone over to the good side I can not imagine going back. Both the rolled oats and wheat germ are full of things that are good for my body and they can be prepared in a way that tastes awesome. I call that a win win.

Side note: Wheat Germ is full of Omega-3 fatty acids, B vitamins, vitamin E, protein and fiber to name a few.

If you make these, please let us know what you think.
Comments make us Happy!
Related Posts Plugin for WordPress, Blogger...